|
|
|
|
# 代码
|
|
|
|
|
|
|
|
|
|
---
|
|
|
|
|
|
|
|
|
|
代码1:
|
|
|
|
|
|
|
|
|
|
在Spring Boot应用程序中实现登录验证码的步骤如下:
|
|
|
|
|
|
|
|
|
|
1. 添加Spring Security和Thymeleaf依赖,以及Google的验证码库:
|
|
|
|
|
|
|
|
|
|
```java
|
|
|
|
|
Copy code
|
|
|
|
|
<dependency>
|
|
|
|
|
<groupId>org.springframework.boot</groupId>
|
|
|
|
|
<artifactId>spring-boot-starter-security</artifactId>
|
|
|
|
|
</dependency>
|
|
|
|
|
<dependency>
|
|
|
|
|
<groupId>org.springframework.boot</groupId>
|
|
|
|
|
<artifactId>spring-boot-starter-thymeleaf</artifactId>
|
|
|
|
|
</dependency>
|
|
|
|
|
<dependency>
|
|
|
|
|
<groupId>com.github.krasa</groupId>
|
|
|
|
|
<artifactId>krasa-jcaptcha</artifactId>
|
|
|
|
|
<version>2.2.1</version>
|
|
|
|
|
</dependency>
|
|
|
|
|
```
|
|
|
|
|
|
|
|
|
|
1. 在application.properties中添加配置:
|
|
|
|
|
|
|
|
|
|
```java
|
|
|
|
|
Copy code
|
|
|
|
|
#开启验证码
|
|
|
|
|
security.enable-csrf=false
|
|
|
|
|
#指定验证码长度
|
|
|
|
|
myapp.captcha.chars=4
|
|
|
|
|
```
|
|
|
|
|
|
|
|
|
|
1. 创建一个CaptchaUtil类来生成验证码图片:
|
|
|
|
|
|
|
|
|
|
```java
|
|
|
|
|
Copy code
|
|
|
|
|
@Service
|
|
|
|
|
public class CaptchaUtil {
|
|
|
|
|
|
|
|
|
|
@Value("${myapp.captcha.chars}")
|
|
|
|
|
private int chars;
|
|
|
|
|
|
|
|
|
|
// 生成验证码图片
|
|
|
|
|
public BufferedImage generateCaptchaImage(String captcha) {
|
|
|
|
|
JCaptcha captchaService = new DefaultManageableImageCaptchaService(new FastHashMapCaptchaStore(), new GMailEngine(), 180, 100000, 75000);
|
|
|
|
|
return captchaService.getImageChallengeForID(captcha);
|
|
|
|
|
}
|
|
|
|
|
|
|
|
|
|
// 生成验证码文字
|
|
|
|
|
public String generateCaptchaChars() {
|
|
|
|
|
return RandomStringUtils.randomAlphanumeric(chars);
|
|
|
|
|
}
|
|
|
|
|
}
|
|
|
|
|
```
|
|
|
|
|
|
|
|
|
|
1. 创建一个CaptchaController类来响应获取验证码图片的请求:
|
|
|
|
|
|
|
|
|
|
```java
|
|
|
|
|
Copy code
|
|
|
|
|
@Controller
|
|
|
|
|
public class CaptchaController {
|
|
|
|
|
|
|
|
|
|
@Autowired
|
|
|
|
|
private CaptchaUtil captchaUtil;
|
|
|
|
|
|
|
|
|
|
@GetMapping("/captcha.jpg")
|
|
|
|
|
public void generateCaptcha(HttpServletRequest request, HttpServletResponse response) throws Exception {
|
|
|
|
|
String captcha = captchaUtil.generateCaptchaChars();
|
|
|
|
|
BufferedImage image = captchaUtil.generateCaptchaImage(captcha);
|
|
|
|
|
|
|
|
|
|
response.setContentType("image/jpeg");
|
|
|
|
|
ServletOutputStream outputStream = response.getOutputStream();
|
|
|
|
|
|
|
|
|
|
ImageIO.write(image, "jpeg", outputStream);
|
|
|
|
|
|
|
|
|
|
outputStream.flush();
|
|
|
|
|
outputStream.close();
|
|
|
|
|
|
|
|
|
|
HttpSession session = request.getSession();
|
|
|
|
|
session.setAttribute("captcha", captcha);
|
|
|
|
|
}
|
|
|
|
|
}
|
|
|
|
|
```
|
|
|
|
|
|
|
|
|
|
1. 在SecurityConfig类中添加验证码验证的逻辑:
|
|
|
|
|
|
|
|
|
|
```java
|
|
|
|
|
Copy code
|
|
|
|
|
@Configuration
|
|
|
|
|
@EnableWebSecurity
|
|
|
|
|
public class SecurityConfig extends WebSecurityConfigurerAdapter {
|
|
|
|
|
|
|
|
|
|
@Autowired
|
|
|
|
|
private CaptchaUtil captchaUtil;
|
|
|
|
|
|
|
|
|
|
@Override
|
|
|
|
|
protected void configure(HttpSecurity http) throws Exception {
|
|
|
|
|
http
|
|
|
|
|
// ...
|
|
|
|
|
.addFilterBefore(new CaptchaFilter("/login", captchaUtil), UsernamePasswordAuthenticationFilter.class)
|
|
|
|
|
// ...
|
|
|
|
|
}
|
|
|
|
|
}
|
|
|
|
|
```
|
|
|
|
|
|
|
|
|
|
1. 创建一个CaptchaFilter类用于验证验证码:
|
|
|
|
|
|
|
|
|
|
```java
|
|
|
|
|
Copy code
|
|
|
|
|
public class CaptchaFilter extends OncePerRequestFilter {
|
|
|
|
|
|
|
|
|
|
private String path;
|
|
|
|
|
private CaptchaUtil captchaUtil;
|
|
|
|
|
|
|
|
|
|
public CaptchaFilter(String path, CaptchaUtil captchaUtil) {
|
|
|
|
|
this.path = path;
|
|
|
|
|
this.captchaUtil = captchaUtil;
|
|
|
|
|
}
|
|
|
|
|
|
|
|
|
|
@Override
|
|
|
|
|
protected void doFilterInternal(HttpServletRequest request, HttpServletResponse response, FilterChain filterChain) throws ServletException, IOException {
|
|
|
|
|
if (request.getMethod().equalsIgnoreCase("post") && path.equals(request.getServletPath() + request.getPathInfo())) {
|
|
|
|
|
String captcha = request.getParameter("captcha");
|
|
|
|
|
HttpSession session = request.getSession();
|
|
|
|
|
Object obj = session.getAttribute("captcha");
|
|
|
|
|
if (obj != null) {
|
|
|
|
|
String captchaCode = obj.toString();
|
|
|
|
|
if (captcha != null && captcha.equalsIgnoreCase(captchaCode)) {
|
|
|
|
|
filterChain.doFilter(request, response);
|
|
|
|
|
return;
|
|
|
|
|
}
|
|
|
|
|
}
|
|
|
|
|
response.sendRedirect(path);
|
|
|
|
|
} else {
|
|
|
|
|
filterChain.doFilter(request, response);
|
|
|
|
|
}
|
|
|
|
|
}
|
|
|
|
|
}
|
|
|
|
|
```
|
|
|
|
|
|
|
|
|
|
1. 修改登录页login.html,添加验证码输入框和验证码图片:
|
|
|
|
|
|
|
|
|
|
```java
|
|
|
|
|
Copy code
|
|
|
|
|
<!DOCTYPE html>
|
|
|
|
|
<html xmlns:th="http://www.thymeleaf.org">
|
|
|
|
|
<head>
|
|
|
|
|
<meta charset="UTF-8">
|
|
|
|
|
<title>Login</title>
|
|
|
|
|
</head>
|
|
|
|
|
<body>
|
|
|
|
|
<h1>Login Page</h1>
|
|
|
|
|
<form th:action="@{/login}" method="post">
|
|
|
|
|
<div>
|
|
|
|
|
<label for="username">Username:</label>
|
|
|
|
|
<input type="text" id="username" name="username"/>
|
|
|
|
|
</div>
|
|
|
|
|
<div>
|
|
|
|
|
<label for="password">Password:</label>
|
|
|
|
|
<input type="password" id="password" name="password"/>
|
|
|
|
|
</div>
|
|
|
|
|
<div>
|
|
|
|
|
<label for="captcha">Captcha:</label>
|
|
|
|
|
<input type="text" id="captcha" name="captcha"/>
|
|
|
|
|
<img src="/captcha.jpg"/>
|
|
|
|
|
</div>
|
|
|
|
|
<button type="submit">Login</button>
|
|
|
|
|
</form>
|
|
|
|
|
</body>
|
|
|
|
|
</html>
|
|
|
|
|
```
|
|
|
|
|
|
|
|
|
|
现在应用启动后,访问<http://localhost:8080/login即可看到包含验证码图片和验证码输入框的登录页面。用户需要在输入用户名和密码的同时输入正确的验证码才能成功登录。>
|
|
|
|
|
|
|
|
|
|
---
|
|
|
|
|
|
|
|
|
|
代码2:
|
|
|
|
|
|
|
|
|
|
Disruptor是一个高性能的事件发布-订阅框架。在Spring Boot应用程序中使用Disruptor,可以实现多线程处理消息,提高应用程序的性能。下面是一个简单的演示,介绍Disruptor如何与Spring Boot结合使用。
|
|
|
|
|
|
|
|
|
|
1. 引入Disruptor依赖:
|
|
|
|
|
|
|
|
|
|
```java
|
|
|
|
|
Copy code
|
|
|
|
|
<dependency>
|
|
|
|
|
<groupId>com.lmax</groupId>
|
|
|
|
|
<artifactId>disruptor</artifactId>
|
|
|
|
|
<version>3.4.2</version>
|
|
|
|
|
</dependency>
|
|
|
|
|
```
|
|
|
|
|
|
|
|
|
|
1. 创建一个消息事件类:
|
|
|
|
|
|
|
|
|
|
```java
|
|
|
|
|
Copy code
|
|
|
|
|
public class MessageEvent {
|
|
|
|
|
|
|
|
|
|
private String message;
|
|
|
|
|
|
|
|
|
|
public void setMessage(String message) {
|
|
|
|
|
this.message = message;
|
|
|
|
|
}
|
|
|
|
|
|
|
|
|
|
public String getMessage() {
|
|
|
|
|
return message;
|
|
|
|
|
}
|
|
|
|
|
}
|
|
|
|
|
```
|
|
|
|
|
|
|
|
|
|
1. 创建一个消息处理器类:
|
|
|
|
|
|
|
|
|
|
```java
|
|
|
|
|
Copy code
|
|
|
|
|
@Component
|
|
|
|
|
public class MessageEventHandler {
|
|
|
|
|
|
|
|
|
|
@Autowired
|
|
|
|
|
private final Logger logger = LoggerFactory.getLogger(MessageEventHandler.class);
|
|
|
|
|
|
|
|
|
|
@Autowired
|
|
|
|
|
private JmsTemplate jmsTemplate;
|
|
|
|
|
|
|
|
|
|
@Autowired
|
|
|
|
|
private Queue queue;
|
|
|
|
|
|
|
|
|
|
@Autowired
|
|
|
|
|
private MessageEventFactory messageFactory;
|
|
|
|
|
|
|
|
|
|
public void onMessage(MessageEvent event, long sequence, boolean endOfBatch) throws Exception {
|
|
|
|
|
logger.info("Event: [{}] has been processed!", event.getMessage());
|
|
|
|
|
jmsTemplate.convertAndSend(queue, event);
|
|
|
|
|
}
|
|
|
|
|
}
|
|
|
|
|
```
|
|
|
|
|
|
|
|
|
|
上面的代码中,当每个事件被处理时,它将触发一个调用将消息呈现在Spring Boot应用程序中的JMS队列中。这个处理器可以在Dusruptor中注册。
|
|
|
|
|
|
|
|
|
|
1. 创建一个消息工厂类:
|
|
|
|
|
|
|
|
|
|
```java
|
|
|
|
|
Copy code
|
|
|
|
|
@Component
|
|
|
|
|
public class MessageEventFactory implements EventFactory<MessageEvent> {
|
|
|
|
|
|
|
|
|
|
@Override
|
|
|
|
|
public MessageEvent newInstance() {
|
|
|
|
|
return new MessageEvent();
|
|
|
|
|
}
|
|
|
|
|
}
|
|
|
|
|
```
|
|
|
|
|
|
|
|
|
|
1. 创建一个Disruptor实例:
|
|
|
|
|
|
|
|
|
|
```java
|
|
|
|
|
Copy code
|
|
|
|
|
@Configuration
|
|
|
|
|
public class DisruptorConfig {
|
|
|
|
|
|
|
|
|
|
@Autowired
|
|
|
|
|
private MessageEventHandler messageEventHandler;
|
|
|
|
|
|
|
|
|
|
@Autowired
|
|
|
|
|
private MessageEventFactory messageEventFactory;
|
|
|
|
|
|
|
|
|
|
@Value("${disruptor.ring-buffer-size}")
|
|
|
|
|
private int ringBufferSize;
|
|
|
|
|
|
|
|
|
|
@Bean
|
|
|
|
|
public Disruptor<MessageEvent> disruptor() {
|
|
|
|
|
final ThreadFactory threadFactory = Executors.defaultThreadFactory();
|
|
|
|
|
final Disruptor<MessageEvent> disruptor = new Disruptor<>(messageEventFactory, ringBufferSize, threadFactory,
|
|
|
|
|
ProducerType.SINGLE, new BlockingWaitStrategy());
|
|
|
|
|
|
|
|
|
|
disruptor.setDefaultExceptionHandler(new ExceptionHandler<MessageEvent>() {
|
|
|
|
|
@Override
|
|
|
|
|
public void handleEventException(Throwable ex, long sequence, MessageEvent event) {
|
|
|
|
|
}
|
|
|
|
|
|
|
|
|
|
@Override
|
|
|
|
|
public void handleOnStartException(Throwable ex) {
|
|
|
|
|
}
|
|
|
|
|
|
|
|
|
|
@Override
|
|
|
|
|
public void handleOnShutdownException(Throwable ex) {
|
|
|
|
|
}
|
|
|
|
|
});
|
|
|
|
|
|
|
|
|
|
RingBuffer<MessageEvent> ringBuffer = disruptor.getRingBuffer();
|
|
|
|
|
MessageEventProcesser processer = new MessageEventProcesser(ringBuffer, messageEventHandler);
|
|
|
|
|
|
|
|
|
|
disruptor.handleEventsWith(processer);
|
|
|
|
|
|
|
|
|
|
disruptor.start();
|
|
|
|
|
|
|
|
|
|
return disruptor;
|
|
|
|
|
}
|
|
|
|
|
}
|
|
|
|
|
```
|
|
|
|
|
|
|
|
|
|
上面的代码中,DisruptorConfig类创建了一个Disruptor实例,并设置了一些参数,例如环形缓冲区大小和处理超时等。它还注册了消息处理器和异常处理器。
|
|
|
|
|
|
|
|
|
|
1. 创建一个消息生产者类:
|
|
|
|
|
|
|
|
|
|
```java
|
|
|
|
|
Copy code
|
|
|
|
|
@Component
|
|
|
|
|
public class MessageEventProducer {
|
|
|
|
|
|
|
|
|
|
@Autowired
|
|
|
|
|
private Disruptor<MessageEvent> disruptor;
|
|
|
|
|
|
|
|
|
|
public void publish(String message) {
|
|
|
|
|
RingBuffer<MessageEvent> ringBuffer = disruptor.getRingBuffer();
|
|
|
|
|
long sequence = ringBuffer.next();
|
|
|
|
|
try {
|
|
|
|
|
MessageEvent event = ringBuffer.get(sequence);
|
|
|
|
|
event.setMessage(message);
|
|
|
|
|
} finally {
|
|
|
|
|
ringBuffer.publish(sequence);
|
|
|
|
|
}
|
|
|
|
|
}
|
|
|
|
|
}
|
|
|
|
|
```
|
|
|
|
|
|
|
|
|
|
上面的代码中,MessageEventProducer类将消息发布到Disruptor中,它使用Disruptor的环形缓冲区来缓存消息。
|
|
|
|
|
|
|
|
|
|
1. 在Spring Boot应用程序中使用Disruptor:
|
|
|
|
|
|
|
|
|
|
```java
|
|
|
|
|
Copy code
|
|
|
|
|
@RestController
|
|
|
|
|
public class MessageController {
|
|
|
|
|
|
|
|
|
|
@Autowired
|
|
|
|
|
private MessageEventProducer messageEventProducer;
|
|
|
|
|
|
|
|
|
|
@GetMapping("/send/{message}")
|
|
|
|
|
public void sendMessage(@PathVariable String message) {
|
|
|
|
|
messageEventProducer.publish(message);
|
|
|
|
|
}
|
|
|
|
|
}
|
|
|
|
|
```
|
|
|
|
|
|
|
|
|
|
上面的代码中,MessageController类可以接收HTTP请求,调用MessageEventProducer将消息发布到Disruptor中。
|
|
|
|
|
|
|
|
|
|
现在应用启动后,访问<http://localhost:8080/send/test即可将消息“test”发布到Disruptor中,由MessageEventProcesser处理并将消息存储在JMS队列中。>
|
|
|
|
|
|
|
|
|
|
---
|
|
|
|
|
|
|
|
|
|
代码3: 【最新的Disruptor的使用】
|
|
|
|
|
|
|
|
|
|
最新版本的Disruptor与Spring Boot的结合使用与早期版本的方法类似。下面是一个基于Spring Boot 2.x的Disruptor示例,在该示例中,我们将通过Spring Boot 2.x应用程序发布事件,并使用Disruptor进行异步事件处理:
|
|
|
|
|
|
|
|
|
|
1. 添加Disruptor依赖:
|
|
|
|
|
|
|
|
|
|
```java
|
|
|
|
|
Copy code
|
|
|
|
|
<dependency>
|
|
|
|
|
<groupId>com.lmax</groupId>
|
|
|
|
|
<artifactId>disruptor</artifactId>
|
|
|
|
|
<version>3.4.4</version>
|
|
|
|
|
</dependency>
|
|
|
|
|
```
|
|
|
|
|
|
|
|
|
|
1. 创建一个事件类:
|
|
|
|
|
|
|
|
|
|
```java
|
|
|
|
|
Copy code
|
|
|
|
|
public class MyEvent {
|
|
|
|
|
private String message;
|
|
|
|
|
|
|
|
|
|
public String getMessage() {
|
|
|
|
|
return message;
|
|
|
|
|
}
|
|
|
|
|
|
|
|
|
|
public void setMessage(String message) {
|
|
|
|
|
this.message = message;
|
|
|
|
|
}
|
|
|
|
|
}
|
|
|
|
|
```
|
|
|
|
|
|
|
|
|
|
1. 创建一个事件处理器:【消费者】
|
|
|
|
|
|
|
|
|
|
```java
|
|
|
|
|
Copy code
|
|
|
|
|
@Component
|
|
|
|
|
public class MyEventHandler {
|
|
|
|
|
@Autowired
|
|
|
|
|
private JmsTemplate jmsTemplate;
|
|
|
|
|
|
|
|
|
|
public void onEvent(MyEvent event, long sequence, boolean endOfBatch) {
|
|
|
|
|
System.out.println("Received message: " + event.getMessage());
|
|
|
|
|
jmsTemplate.convertAndSend(event.getMessage());
|
|
|
|
|
}
|
|
|
|
|
}
|
|
|
|
|
```
|
|
|
|
|
|
|
|
|
|
1. 创建一个Disruptor配置类:
|
|
|
|
|
|
|
|
|
|
```java
|
|
|
|
|
Copy code
|
|
|
|
|
@Configuration
|
|
|
|
|
@EnableConfigurationProperties(DisruptorProperties.class)
|
|
|
|
|
public class DisruptorConfig {
|
|
|
|
|
@Autowired
|
|
|
|
|
private ApplicationContext applicationContext;
|
|
|
|
|
|
|
|
|
|
@Autowired
|
|
|
|
|
private DisruptorProperties disruptorProperties;
|
|
|
|
|
|
|
|
|
|
@Bean(destroyMethod = "shutdown")
|
|
|
|
|
public Disruptor<MyEvent> disruptor() {
|
|
|
|
|
Executor executor = Executors.newFixedThreadPool(disruptorProperties.getConsumerCount()); //注释:了解ConsumerCount的作用。
|
|
|
|
|
|
|
|
|
|
Disruptor<MyEvent> disruptor = new Disruptor<>(new EventFactory<MyEvent>() {
|
|
|
|
|
@Override
|
|
|
|
|
public MyEvent newInstance() {
|
|
|
|
|
return new MyEvent();
|
|
|
|
|
}
|
|
|
|
|
}, disruptorProperties.getBufferSize(), executor);
|
|
|
|
|
|
|
|
|
|
EventHandlerGroup<MyEvent> eventHandlerGroup =
|
|
|
|
|
disruptor.handleEventsWith(new MyEventHandler());
|
|
|
|
|
|
|
|
|
|
for (int i = 0; i < disruptorProperties.getConsumerCount() - 1; i++) {
|
|
|
|
|
eventHandlerGroup.then(new MyEventHandler());
|
|
|
|
|
}
|
|
|
|
|
disruptor.start();
|
|
|
|
|
|
|
|
|
|
return disruptor;
|
|
|
|
|
}
|
|
|
|
|
|
|
|
|
|
@Bean
|
|
|
|
|
public DisruptorPublisher<MyEvent> disruptorPublisher(@Autowired Disruptor<MyEvent> disruptor) {
|
|
|
|
|
return new DisruptorPublisher<>(disruptor);
|
|
|
|
|
}
|
|
|
|
|
|
|
|
|
|
@Bean
|
|
|
|
|
public ApplicationRunner runner(DisruptorPublisher<MyEvent> publisher) {
|
|
|
|
|
return args -> {
|
|
|
|
|
String[] messages = {"Message 1", "Message 2", "Message 3"};
|
|
|
|
|
for (String message : messages) {
|
|
|
|
|
MyEvent event = new MyEvent();
|
|
|
|
|
event.setMessage(message);
|
|
|
|
|
publisher.publish(event);
|
|
|
|
|
}
|
|
|
|
|
};
|
|
|
|
|
}
|
|
|
|
|
}
|
|
|
|
|
```
|
|
|
|
|
|
|
|
|
|
上面的代码中,DisruptorConfig类创建了一个Disruptor实例,并使用默认的线程池来处理事件。我们还可以定义消费者个数和缓冲区大小。在这个例子中,我们设置了一个消费者和一个大小为1024的环形缓冲区。
|
|
|
|
|
|
|
|
|
|
1. 创建一个DisruptorPublisher类:
|
|
|
|
|
|
|
|
|
|
```java
|
|
|
|
|
Copy code
|
|
|
|
|
public class DisruptorPublisher<T> {
|
|
|
|
|
private RingBuffer<T> ringBuffer;
|
|
|
|
|
|
|
|
|
|
public DisruptorPublisher(Disruptor<T> disruptor) {
|
|
|
|
|
ringBuffer = disruptor.getRingBuffer();
|
|
|
|
|
}
|
|
|
|
|
|
|
|
|
|
public void publish(T message) {
|
|
|
|
|
long sequence = ringBuffer.next();
|
|
|
|
|
try {
|
|
|
|
|
T event = ringBuffer.get(sequence);
|
|
|
|
|
BeanUtils.copyProperties(message, event);
|
|
|
|
|
} finally {
|
|
|
|
|
ringBuffer.publish(sequence);
|
|
|
|
|
}
|
|
|
|
|
}
|
|
|
|
|
}
|
|
|
|
|
```
|
|
|
|
|
|
|
|
|
|
1. 在Spring Boot应用程序中使用DisruptorPublisher:
|
|
|
|
|
|
|
|
|
|
```java
|
|
|
|
|
Copy code
|
|
|
|
|
@RestController
|
|
|
|
|
@RequestMapping("/")
|
|
|
|
|
public class MyController {
|
|
|
|
|
@Autowired
|
|
|
|
|
private DisruptorPublisher<MyEvent> publisher;
|
|
|
|
|
|
|
|
|
|
@GetMapping("/{message}")
|
|
|
|
|
public String publishMessage(@PathVariable String message) {
|
|
|
|
|
MyEvent event = new MyEvent();
|
|
|
|
|
event.setMessage(message);
|
|
|
|
|
publisher.publish(event);
|
|
|
|
|
return "Message published: " + message;
|
|
|
|
|
}
|
|
|
|
|
}
|
|
|
|
|
```
|
|
|
|
|
|
|
|
|
|
上面的代码中,MyController定义了一个'/ {message}'端点,用于发布事件到Disruptor中。当我们发送一个GET请求到此端点时,消息会被发布到Disruptor中,由MyEventHandler异步地处理消息。
|
|
|
|
|
|
|
|
|
|
现在应用启动后,访问<http://localhost:8080/{message},可以将消息发布到Disruptor中异步处理。>
|
|
|
|
|
|
|
|
|
|
---
|
|
|
|
|
|
|
|
|
|
是的,使用Spring Boot的@Repository注解和MapStruct结合起来可以实现更加简洁和易于维护的代码。下面是实现的步骤:
|
|
|
|
|
|
|
|
|
|
1. 创建Entity和DTO类:与之前的步骤相同,创建一个UserEntity和UserDto类,并在其中定义属性和getter、setter方法。
|
|
|
|
|
|
|
|
|
|
```java
|
|
|
|
|
Copy code
|
|
|
|
|
public class UserEntity {
|
|
|
|
|
// 属性,getter、setter 方法
|
|
|
|
|
}
|
|
|
|
|
|
|
|
|
|
public class UserDto {
|
|
|
|
|
// 属性,getter、setter 方法
|
|
|
|
|
}
|
|
|
|
|
```
|
|
|
|
|
|
|
|
|
|
1. 添加依赖:在Maven中添加以下依赖,以便可以使用Spring Boot和MapStruct:
|
|
|
|
|
|
|
|
|
|
```java
|
|
|
|
|
Copy code
|
|
|
|
|
<dependency>
|
|
|
|
|
<groupId>org.springframework.boot</groupId>
|
|
|
|
|
<artifactId>spring-boot-starter-data-jpa</artifactId>
|
|
|
|
|
</dependency>
|
|
|
|
|
|
|
|
|
|
<dependency>
|
|
|
|
|
<groupId>org.mapstruct</groupId>
|
|
|
|
|
<artifactId>mapstruct-jdk8</artifactId>
|
|
|
|
|
<version>{version}</version>
|
|
|
|
|
</dependency>
|
|
|
|
|
|
|
|
|
|
<dependency>
|
|
|
|
|
<groupId>org.mapstruct</groupId>
|
|
|
|
|
<artifactId>mapstruct-processor</artifactId>
|
|
|
|
|
<version>{version}</version>
|
|
|
|
|
</dependency>
|
|
|
|
|
```
|
|
|
|
|
|
|
|
|
|
1. 创建映射接口:创建一个UserMapper接口,并使用@Mapper注解标记它。类似于下面的代码:
|
|
|
|
|
|
|
|
|
|
```java
|
|
|
|
|
Copy code
|
|
|
|
|
@Mapper(componentModel = "spring")
|
|
|
|
|
public interface UserMapper {
|
|
|
|
|
UserDto toDto(UserEntity userEntity);
|
|
|
|
|
UserEntity toEntity(UserDto userDto);
|
|
|
|
|
}
|
|
|
|
|
```
|
|
|
|
|
|
|
|
|
|
可以看到,这个代码与我们之前的示例很相似,唯一的不同是我们添加了`@Mapper(componentModel = "spring")`注解,以使该接口变成一个由MapStruct映射的Spring组件。
|
|
|
|
|
|
|
|
|
|
1. 创建JPA Repository接口:创建一个UserRepository接口,并使用@Repository注解标志它。如下所示:
|
|
|
|
|
|
|
|
|
|
```java
|
|
|
|
|
Copy code
|
|
|
|
|
@Repository
|
|
|
|
|
public interface UserRepository extends JpaRepository<UserEntity, Long> {
|
|
|
|
|
|
|
|
|
|
}
|
|
|
|
|
```
|
|
|
|
|
|
|
|
|
|
1. 使用映射接口转换Entity和DTO:在Service中注入UserRepository和UserMapper后,就可以使用它们来转换Entity和DTO对象了。示例代码如下:
|
|
|
|
|
|
|
|
|
|
```java
|
|
|
|
|
Copy code
|
|
|
|
|
@Service
|
|
|
|
|
public class UserServiceImpl implement UserService {
|
|
|
|
|
@Autowire UserRepository userRepository;
|
|
|
|
|
@Autowire UserMapper userMapper;
|
|
|
|
|
|
|
|
|
|
public UserDto getUserById(Long id) {
|
|
|
|
|
UserEntity userEntity = userRepository.getById(id); //通过ID获取数据
|
|
|
|
|
UserDto userDto = userMapper.toDto(userEntity); // 通过转方式转到DTO
|
|
|
|
|
return userDto;
|
|
|
|
|
}
|
|
|
|
|
|
|
|
|
|
public UserEntity createUser(UserDto userDto) {
|
|
|
|
|
UserEntity userEntity = userMapper.toEntity(userDto);
|
|
|
|
|
UserEntity savedUserEntity = userRepository.save(userEntity);
|
|
|
|
|
return savedUserEntity;
|
|
|
|
|
}
|
|
|
|
|
}
|
|
|
|
|
```
|
|
|
|
|
|
|
|
|
|
这样,就可以使用Spring Boot的特殊注解评论@Repository和MapStruct在代码中完成Entity和DTO之间的转换。
|
|
|
|
|
|
|
|
|
|
---
|
|
|
|
|
|
|
|
|
|
````java
|
|
|
|
|
在使用mapStruct结合Java的泛型通过接口的方式实现类型转换Vo、DTO、Entity时,需要使用以下步骤:
|
|
|
|
|
1. 创建一个公共接口,使用泛型定义类型(例如:CommonMapper)。
|
|
|
|
|
```
|
|
|
|
|
public interface CommonMapper {
|
|
|
|
|
T sourceToTarget(S source);
|
|
|
|
|
S targetToSource(T target);
|
|
|
|
|
List sourceToTarget(List sourceList);
|
|
|
|
|
List targetToSource(List targetList);
|
|
|
|
|
}
|
|
|
|
|
```
|
|
|
|
|
2. 创建实际的Vo、DTO、Entity之间的转换接口(例如:UserMapper)。
|
|
|
|
|
```
|
|
|
|
|
@Mapper(componentModel = "spring")
|
|
|
|
|
public interface UserMapper extends CommonMapper {
|
|
|
|
|
}
|
|
|
|
|
```
|
|
|
|
|
3. 在转换接口中实现CommonMapper接口的方法。
|
|
|
|
|
```
|
|
|
|
|
public interface UserMapper extends CommonMapper {
|
|
|
|
|
@Override
|
|
|
|
|
UserDto sourceToTarget(UserVo userVo);
|
|
|
|
|
@Override
|
|
|
|
|
UserVo targetToSource(UserDto userDto);
|
|
|
|
|
@Override
|
|
|
|
|
List sourceToTarget(List userVoList);
|
|
|
|
|
@Override
|
|
|
|
|
List targetToSource(List userDtoList);
|
|
|
|
|
}
|
|
|
|
|
```
|
|
|
|
|
4. 在需要使用转换的地方,调用转换接口中的对应方法。
|
|
|
|
|
```
|
|
|
|
|
@Autowired
|
|
|
|
|
UserMapper userMapper;
|
|
|
|
|
UserVo userVo = userMapper.targetToSource(userDto);
|
|
|
|
|
UserDto userDto = userMapper.sourceToTarget(userVo);
|
|
|
|
|
```
|
|
|
|
|
以上就是mapStruct结合Java的泛型通过接口的方式实现类型转换Vo、DTO、Entity的代码实现过程。
|
|
|
|
|
````
|
|
|
|
|
|
|
|
|
|
---
|
|
|
|
|
|
|
|
|
|
使用 MapStruct 结合 Java 泛型转换 VO、DTO、Entity 类型的代码示例:假设我们有以下三个类:VO 类:
|
|
|
|
|
|
|
|
|
|
```java
|
|
|
|
|
public class CarVO {
|
|
|
|
|
private String name;
|
|
|
|
|
private String color;
|
|
|
|
|
// getter/setter 方法
|
|
|
|
|
}
|
|
|
|
|
```
|
|
|
|
|
|
|
|
|
|
DTO 类:
|
|
|
|
|
|
|
|
|
|
```java
|
|
|
|
|
public class CarDTO {
|
|
|
|
|
private String modelName;
|
|
|
|
|
private String carColor;
|
|
|
|
|
// getter/setter 方法
|
|
|
|
|
}
|
|
|
|
|
```
|
|
|
|
|
|
|
|
|
|
Entity 类:
|
|
|
|
|
|
|
|
|
|
```java
|
|
|
|
|
public class CarEntity {
|
|
|
|
|
private String modelName;
|
|
|
|
|
private String carColor;
|
|
|
|
|
private int year;
|
|
|
|
|
// getter/setter 方法
|
|
|
|
|
}
|
|
|
|
|
```
|
|
|
|
|
|
|
|
|
|
根据上述三个类,我们可以使用 MapStruct 进行转换,代码如下:Mapper 接口:
|
|
|
|
|
|
|
|
|
|
```java
|
|
|
|
|
@Mapper(componentModel = "spring")
|
|
|
|
|
public interface CarMapper {
|
|
|
|
|
CarMapper = Mappers.getMapper(CarMapper.class);
|
|
|
|
|
@Mapping(source = "name", target = "modelName")
|
|
|
|
|
@Mapping(source = "color", target = "carColor")
|
|
|
|
|
CarDTO toDTO(CarVO vo);
|
|
|
|
|
@Mapping(source = "modelName", target = "modelName")
|
|
|
|
|
@Mapping(source = "carColor", target = "carColor")
|
|
|
|
|
CarEntity toEntity(CarDTO dto);
|
|
|
|
|
@Mapping(source = "modelName", target = "name")
|
|
|
|
|
@Mapping(source = "carColor", target = "color")
|
|
|
|
|
CarVO toVO(CarEntity entity);
|
|
|
|
|
default <T> T map(Object source, Class<T> targetClass) {
|
|
|
|
|
if (source == null) {
|
|
|
|
|
return null;
|
|
|
|
|
}
|
|
|
|
|
if (targetClass.equals(CarVO.class)) {
|
|
|
|
|
return (T) toVO((CarEntity) source);
|
|
|
|
|
}
|
|
|
|
|
if (targetClass.equals(CarDTO.class)) {
|
|
|
|
|
return (T) toDTO((CarVO) source);
|
|
|
|
|
}
|
|
|
|
|
if (targetClass.equals(CarEntity.class)) {
|
|
|
|
|
return (T) toEntity((CarDTO) source);
|
|
|
|
|
}
|
|
|
|
|
// 暂不处理其他类型转换
|
|
|
|
|
throw new IllegalArgumentException("Unsupported target class: " + targetClass.getName());
|
|
|
|
|
}
|
|
|
|
|
}
|
|
|
|
|
```
|
|
|
|
|
|
|
|
|
|
上述代码中,我们定义了 `CarMapper` 接口,并使用 `@Mapper(componentModel = "spring")` 注解进行标注,表示我们将 MapStruct 作为 Spring 组件使用。接着,我们定义了三个转换方法,分别是将 VO 类型转换成 DTO 类型的 `toDTO()` 方法,将 DTO 类型转换成 Entity 类型的 `toEntity()` 方法,将 Entity 类型转换成 VO 类型的 `toVO()` 方法。在转换的过程中,我们通过 `@Mapping` 注解来指定属性之间的映射关系。此外,我们还定义了一个泛型方法 `map()`,用于实现任意类型之间的转换。在 `map()` 方法中,我们通过判断目标类型来调用对应的转换方法进行转换。至此,我们已经实现了通过 MapStruct 结合 Java 泛型将 VO、DTO、Entity 类型进行转换的代码。
|
|
|
|
|
|
|
|
|
|
---
|
|
|
|
|
|
|
|
|
|
如果你需要在实现类中重写PersonMapper接口中的toPersonDTO方法,可以按照以下步骤进行操作:1.创建一个实现类,并继承PersonMapper接口。例如:
|
|
|
|
|
|
|
|
|
|
```java
|
|
|
|
|
java
|
|
|
|
|
public class PersonMapperImpl implements PersonMapper {
|
|
|
|
|
}
|
|
|
|
|
```
|
|
|
|
|
|
|
|
|
|
2.在实现类中实现toPersonDTO方法,并添加@Override注解。例如:
|
|
|
|
|
|
|
|
|
|
```java
|
|
|
|
|
java
|
|
|
|
|
@Override
|
|
|
|
|
public PersonDTO toPersonDTO(Person person) {
|
|
|
|
|
//实现映射逻辑
|
|
|
|
|
}
|
|
|
|
|
```
|
|
|
|
|
|
|
|
|
|
3.如果需要使用MapStruct默认的按属性名称映射规则,可以直接调用MapStruct生成的映射方法。例如:
|
|
|
|
|
|
|
|
|
|
```java
|
|
|
|
|
java
|
|
|
|
|
@Override
|
|
|
|
|
public PersonDTO toPersonDTO(Person person) {
|
|
|
|
|
return PersonMapperImpl.INSTANCE.toPersonDTO(person);
|
|
|
|
|
}
|
|
|
|
|
```
|
|
|
|
|
|
|
|
|
|
其中,INSTANCE是MapStruct自动生成的实例,用于调用toPersonDTO方法完成映射。请注意,INSTANCE名称与实现类名称类似,但添加了后缀“_Impl”。4.如果需要自定义映射规则,可以在重写方法中添加@Mapping注解,并实现自定义逻辑。例如:
|
|
|
|
|
|
|
|
|
|
```java
|
|
|
|
|
java
|
|
|
|
|
@Override
|
|
|
|
|
public PersonDTO toPersonDTO(Person person) {
|
|
|
|
|
PersonDTO dto = new PersonDTO();
|
|
|
|
|
dto.setFullName(person.getName());
|
|
|
|
|
dto.setBirthYear(calculateBirthYear(person));
|
|
|
|
|
return dto;
|
|
|
|
|
}
|
|
|
|
|
private int calculateBirthYear(Person person) {
|
|
|
|
|
return LocalDate.now().minusYears(person.getAge()).getYear();
|
|
|
|
|
}
|
|
|
|
|
```
|
|
|
|
|
|
|
|
|
|
在上面的代码中,我们手动将Person类的name属性映射到PersonDTO类的fullName属性,并使用自定义方法calculateBirthYear将Person类的age属性映射到PersonDTO类的birthYear属性。5.最后,记得根据需要添加其他映射方法,并在实现类中实现。完成后,你可以在应用程序中使用PersonMapperImpl实现类,调用toPersonDTO方法将Person实例映射为PersonDTO实例。例如:
|
|
|
|
|
|
|
|
|
|
```java
|
|
|
|
|
java
|
|
|
|
|
PersonMapper mapper = new PersonMapperImpl();
|
|
|
|
|
Person person = new Person();
|
|
|
|
|
person.setName("张三");
|
|
|
|
|
person.setAge(20);
|
|
|
|
|
PersonDTO dto = mapper.toPersonDTO(person);
|
|
|
|
|
System.out.println(dto.getFullName()); //输出"张三"
|
|
|
|
|
System.out.println(dto.getBirthYear()); //输出1999
|
|
|
|
|
```
|
|
|
|
|
|
|
|
|
|
---
|
|
|
|
|
|
|
|
|
|
在Mybatis中,使用注释来设置mapUnderscoreToCamelCase需要在Mybatis配置文件中配置一个插件org.apache.ibatis.builder.ExamplePlugin。该插件可以自动将数据库中下划线命名法的列名转换为驼峰命名法的字段名。
|
|
|
|
|
|
|
|
|
|
在映射文件中可以通过以下方式来使用该插件:
|
|
|
|
|
|
|
|
|
|
```java
|
|
|
|
|
Copy code
|
|
|
|
|
<!-- 配置ExamplePlugin-->
|
|
|
|
|
<plugins>
|
|
|
|
|
<plugin interceptor="org.apache.ibatis.builder.ExamplePlugin">
|
|
|
|
|
<!-- 设置 mapUnderscoreToCamelCase 为 true -->
|
|
|
|
|
<property name="mapUnderscoreToCamelCase" value="true"/>
|
|
|
|
|
</plugin>
|
|
|
|
|
</plugins>
|
|
|
|
|
```
|
|
|
|
|
|
|
|
|
|
设置mapUnderscoreToCamelCase为true就可以开启插件,插件会自动将数据库中下划线命名法的列名转换为驼峰命名法的字段名。在映射文件中就不需要再使用resultMap来手动映射字段名了。
|
|
|
|
|
|
|
|
|
|
---
|
|
|
|
|
|
|
|
|
|
结合JWT,Spring Boot,MyBatis和验证码生成器实现验证登录的步骤如下:
|
|
|
|
|
|
|
|
|
|
1. 添加依赖
|
|
|
|
|
|
|
|
|
|
在pom.xml中添加以下依赖:
|
|
|
|
|
|
|
|
|
|
```java
|
|
|
|
|
Copy code
|
|
|
|
|
<dependencies>
|
|
|
|
|
<!-- Spring Security -->
|
|
|
|
|
<dependency>
|
|
|
|
|
<groupId>org.springframework.boot</groupId>
|
|
|
|
|
<artifactId>spring-boot-starter-security</artifactId>
|
|
|
|
|
</dependency>
|
|
|
|
|
|
|
|
|
|
<!-- JWT -->
|
|
|
|
|
<dependency>
|
|
|
|
|
<groupId>io.jsonwebtoken</groupId>
|
|
|
|
|
<artifactId>jjwt</artifactId>
|
|
|
|
|
<version>0.9.1</version>
|
|
|
|
|
</dependency>
|
|
|
|
|
|
|
|
|
|
<!-- MyBatis-Plus -->
|
|
|
|
|
<dependency>
|
|
|
|
|
<groupId>com.baomidou</groupId>
|
|
|
|
|
<artifactId>mybatis-plus-boot-starter</artifactId>
|
|
|
|
|
<version>3.4.2</version>
|
|
|
|
|
</dependency>
|
|
|
|
|
|
|
|
|
|
<!-- 验证码生成器 -->
|
|
|
|
|
<dependency>
|
|
|
|
|
<groupId>com.github.axet</groupId>
|
|
|
|
|
<artifactId>kaptcha</artifactId>
|
|
|
|
|
<version>0.0.9</version>
|
|
|
|
|
</dependency>
|
|
|
|
|
</dependencies>
|
|
|
|
|
```
|
|
|
|
|
|
|
|
|
|
1. 配置Spring Security
|
|
|
|
|
|
|
|
|
|
创建一个配置类,继承`WebSecurityConfigurerAdapter`,并重写`configure(HttpSecurity http)`和`configure(AuthenticationManagerBuilder auth)`方法,分别设置安全配置和身份验证规则。例如:
|
|
|
|
|
|
|
|
|
|
```java
|
|
|
|
|
Copy code
|
|
|
|
|
@Configuration
|
|
|
|
|
@EnableWebSecurity
|
|
|
|
|
public class SecurityConfig extends WebSecurityConfigurerAdapter {
|
|
|
|
|
|
|
|
|
|
@Autowired
|
|
|
|
|
private UserDetailsService userDetailsService;
|
|
|
|
|
|
|
|
|
|
@Autowired
|
|
|
|
|
private KaptchaConfig kaptchaConfig;
|
|
|
|
|
|
|
|
|
|
@Override
|
|
|
|
|
protected void configure(HttpSecurity http) throws Exception {
|
|
|
|
|
http.csrf().disable()
|
|
|
|
|
.authorizeRequests()
|
|
|
|
|
.antMatchers("/login", "/logout", "/captcha").permitAll()
|
|
|
|
|
.anyRequest().authenticated()
|
|
|
|
|
.and()
|
|
|
|
|
.formLogin()
|
|
|
|
|
.loginPage("/login")
|
|
|
|
|
.defaultSuccessUrl("/home")
|
|
|
|
|
.failureUrl("/login?error")
|
|
|
|
|
.usernameParameter("username")
|
|
|
|
|
.passwordParameter("password")
|
|
|
|
|
.permitAll()
|
|
|
|
|
.and()
|
|
|
|
|
.logout()
|
|
|
|
|
.logoutUrl("/logout")
|
|
|
|
|
.logoutSuccessUrl("/login")
|
|
|
|
|
.permitAll()
|
|
|
|
|
.and()
|
|
|
|
|
.exceptionHandling()
|
|
|
|
|
.accessDeniedPage("/403");
|
|
|
|
|
|
|
|
|
|
// 配置验证码过滤器
|
|
|
|
|
http.addFilterBefore(new KaptchaFilter("/login", kaptchaConfig), UsernamePasswordAuthenticationFilter.class);
|
|
|
|
|
}
|
|
|
|
|
|
|
|
|
|
@Autowired
|
|
|
|
|
public void configure(AuthenticationManagerBuilder auth) throws Exception {
|
|
|
|
|
auth.userDetailsService(userDetailsService).passwordEncoder(passwordEncoder());
|
|
|
|
|
}
|
|
|
|
|
|
|
|
|
|
@Bean
|
|
|
|
|
public PasswordEncoder passwordEncoder() {
|
|
|
|
|
return new BCryptPasswordEncoder();
|
|
|
|
|
}
|
|
|
|
|
}
|
|
|
|
|
```
|
|
|
|
|
|
|
|
|
|
以上代码中,使用了 `KaptchaFilter` 过滤器来实现验证码验证。这个过虑器默认在 `UsernamePasswordAuthenticationFilter` 前执行。
|
|
|
|
|
|
|
|
|
|
1. 创建用户服务
|
|
|
|
|
|
|
|
|
|
使用 MyBatis-Plus 从数据库中加载用户信息和角色信息。
|
|
|
|
|
|
|
|
|
|
```java
|
|
|
|
|
Copy code
|
|
|
|
|
@Service
|
|
|
|
|
public class UserServiceImpl implements UserDetailsService {
|
|
|
|
|
|
|
|
|
|
@Autowired
|
|
|
|
|
private UserMapper userMapper;
|
|
|
|
|
|
|
|
|
|
@Override
|
|
|
|
|
public UserDetails loadUserByUsername(String username) throws UsernameNotFoundException {
|
|
|
|
|
User user = userMapper.selectOne(new QueryWrapper<User>().eq("username", username));
|
|
|
|
|
if (user == null) {
|
|
|
|
|
throw new UsernameNotFoundException("用户名不存在");
|
|
|
|
|
}
|
|
|
|
|
List<Role> roles = userMapper.getRolesByUserId(user.getId());
|
|
|
|
|
return new MyUserDetails(user, roles);
|
|
|
|
|
}
|
|
|
|
|
}
|
|
|
|
|
```
|
|
|
|
|
|
|
|
|
|
如果查询结果为空,抛出 `UsernameNotFoundException` 异常。
|
|
|
|
|
|
|
|
|
|
如果查询结果不为空,则再通过 `getRolesByUserId` 方法查询该用户的所有角色信息,构建一个 `MyUserDetails` 对象,并返回。
|
|
|
|
|
|
|
|
|
|
`MyUserDetails` 继承自 Spring Security 提供的 `User` 类,通过实现其构造函数来设置用户的角色信息:
|
|
|
|
|
|
|
|
|
|
```java
|
|
|
|
|
Copy code
|
|
|
|
|
public MyUserDetails(User user, List<Role> roles) {
|
|
|
|
|
super(user.getUsername(), user.getPassword(), getAuthorities(roles));
|
|
|
|
|
this.user = user;
|
|
|
|
|
}
|
|
|
|
|
|
|
|
|
|
private static Collection<? extends GrantedAuthority> getAuthorities(List<Role> roles) {
|
|
|
|
|
List<SimpleGrantedAuthority> authorities = new ArrayList<>();
|
|
|
|
|
for (Role role : roles) {
|
|
|
|
|
authorities.add(new SimpleGrantedAuthority(role.getName()));
|
|
|
|
|
}
|
|
|
|
|
return authorities;
|
|
|
|
|
}
|
|
|
|
|
```
|
|
|
|
|
|
|
|
|
|
其中,`getAuthorities` 方法用来将角色列表转换为 Spring Security 能够识别的权限列表。
|
|
|
|
|
|
|
|
|
|
这样,在用户登录成功后,Spring Security 就能够根据用户名称从数据库中获取用户信息并进行身份验证。
|
|
|
|
|
|
|
|
|
|
---
|
|
|
|
|
|
|
|
|
|
算法:
|
|
|
|
|
|
|
|
|
|
希尔排序实际应用:
|
|
|
|
|
|
|
|
|
|
---
|
|
|
|
|
在Spring Boot项目中,实现希尔排序可以采用以下步骤:
|
|
|
|
|
1.定义一个排序方法,使用希尔排序算法实现排序过程。
|
|
|
|
|
2.编写测试类,测试排序方法的正确性和效率。
|
|
|
|
|
3.在需要排序的地方调用排序方法。
|
|
|
|
|
下面是一个简单的示例代码:
|
|
|
|
|
|
|
|
|
|
```java
|
|
|
|
|
//定义希尔排序算法
|
|
|
|
|
public static void shellSort(int[] arr) {
|
|
|
|
|
int n = arr.length;
|
|
|
|
|
for (int gap = n / 2; gap > 0; gap /= 2) {
|
|
|
|
|
for (int i = gap; i < n; i++) {
|
|
|
|
|
int temp = arr[i];
|
|
|
|
|
int j = i;
|
|
|
|
|
for (; j >= gap && arr[j - gap] > temp; j -= gap) {
|
|
|
|
|
arr[j] = arr[j - gap];
|
|
|
|
|
}
|
|
|
|
|
arr[j] = temp;
|
|
|
|
|
}
|
|
|
|
|
}
|
|
|
|
|
}
|
|
|
|
|
//测试排序方法
|
|
|
|
|
public static void main(String[] args) {
|
|
|
|
|
int[] arr = {3, 1, 6, 2, 5, 8, 7, 4};
|
|
|
|
|
System.out.println("排序前:" + Arrays.toString(arr));
|
|
|
|
|
shellSort(arr);
|
|
|
|
|
System.out.println("排序后:" + Arrays.toString(arr));
|
|
|
|
|
}
|
|
|
|
|
//在需要排序的地方调用排序方法
|
|
|
|
|
public void testSort(){
|
|
|
|
|
int[] arr = {3, 1, 6, 2, 5, 8, 7, 4};
|
|
|
|
|
ShellSort.shellSort(arr);
|
|
|
|
|
}
|
|
|
|
|
```
|
|
|
|
|
|
|
|
|
|
上述示例代码中,我们首先定义了一个静态方法`shellSort`,并在其中实现了希尔排序算法。然后,我们编写了一个测试类`main`,并在其中测试了排序方法的正确性和效率。最后,我们在需要排序的地方调用了排序方法。需要注意的是,在Spring Boot项目中,所有的Java代码都应当放在正确的包中,并通过Maven或Gradle等构建工具进行管理。
|
|
|
|
|
|
|
|
|
|
---
|
|
|
|
|
|
|
|
|
|
思路1:
|
|
|
|
|
|
|
|
|
|
登录流程。
|
|
|
|
|
|
|
|
|
|
通过vue的前端
|
|
|
|
|
|
|
|
|
|
输入密码。
|
|
|
|
|
|
|
|
|
|
点击登录,发送数据到spring boot 后台检查。是否存在。存在则就返回一个响应,vue接收到这个响应。并处理这个响应。
|
|
|
|
|
|
|
|
|
|
vue中:
|
|
|
|
|
获取到后端的数据后,判断这个数据是否是一个成功的响应。判断是否为200.
|
|
|
|
|
|
|
|
|
|
然后将所传回来的msg的内容通过路由传递到后台首页的弹窗中。将内容显示出来。
|
|
|
|
|
|
|
|
|
|
至此登录提示功能完成。
|
|
|
|
|
|
|
|
|
|
---
|
|
|
|
|
|
|
|
|
|
## 需求:完成登录的前权限判断
|
|
|
|
|
|
|
|
|
|
> 哦不对,是先将用户传入到后台,然后后台查询后,并对其中的权限查询。
|
|
|
|
|
随后把获取到的权限返回给前端。
|
|
|
|
|
|
|
|
|
|
1. 先将后台的权限从数据库里面拿出来。
|
|
|
|
|
2. 接着将处理好的权限返回给前端。
|
|
|
|
|
3. 前端获取到后进行判断,随即根据vue的权限判断方法,动态的添加子组件。并渲染出来。
|
|
|
|
|
|
|
|
|
|
## 需求:实现组件之间的通信
|
|
|
|
|
|
|
|
|
|
当我们需要在各个组件之间传递数据。可以采用双向数据绑定,通过props + v-bind的形式来进行数据双向绑定。
|
|
|
|
|
|
|
|
|
|
代码实例:
|
|
|
|
|
|
|
|
|
|
```vue
|
|
|
|
|
export default {
|
|
|
|
|
props: {
|
|
|
|
|
name: String // 这里是定义props的结构体的参数。或者是相当于Java中对象的属性。
|
|
|
|
|
}
|
|
|
|
|
}
|
|
|
|
|
--- 分割线---
|
|
|
|
|
|
|
|
|
|
// 那么首先展示静态的绑定数据。
|
|
|
|
|
<Myprops name="hi" />
|
|
|
|
|
|
|
|
|
|
//接下来展示动态绑定数据。
|
|
|
|
|
<Myprops :name="你好!"/>
|
|
|
|
|
//更加复杂的数据绑定
|
|
|
|
|
<Myprops :name="post.title+'by'+post.name"/>
|
|
|
|
|
```
|
|
|
|
|
|
|
|
|
|
同时,它所支持的绑定的类型有很多:
|
|
|
|
|
如:
|
|
|
|
|
|
|
|
|
|
object 类型的
|
|
|
|
|
|
|
|
|
|
```vue
|
|
|
|
|
<!-- 虽然这个对象字面量是个常量,我们还是需要使用 v-bind -->
|
|
|
|
|
<!-- 因为这是一个 JavaScript 表达式而不是一个字符串 -->
|
|
|
|
|
<BlogPost
|
|
|
|
|
:author="{
|
|
|
|
|
name: 'Veronica',
|
|
|
|
|
company: 'Veridian Dynamics'
|
|
|
|
|
}" />
|
|
|
|
|
|
|
|
|
|
<!-- 根据一个变量的值动态传入 -->
|
|
|
|
|
<BlogPost :author="post.author" />
|
|
|
|
|
```
|
|
|
|
|
|
|
|
|
|
Arry类型的
|
|
|
|
|
|
|
|
|
|
```vue
|
|
|
|
|
<!-- 虽然这个数组是个常量,我们还是需要使用 v-bind -->
|
|
|
|
|
<!-- 因为这是一个 JavaScript 表达式而不是一个字符串 -->
|
|
|
|
|
<BlogPost :comment-ids="[234, 266, 273]" />
|
|
|
|
|
|
|
|
|
|
<!-- 根据一个变量的值动态传入 -->
|
|
|
|
|
<BlogPost :comment-ids="post.commentIds" />
|
|
|
|
|
```
|
|
|
|
|
|
|
|
|
|
boolean类型的
|
|
|
|
|
|
|
|
|
|
```vue
|
|
|
|
|
<!-- 仅写上 prop 但不传值,会隐式转换为 `true` -->
|
|
|
|
|
<BlogPost is-published />
|
|
|
|
|
|
|
|
|
|
<!-- 虽然 `false` 是静态的值,我们还是需要使用 v-bind -->
|
|
|
|
|
<!-- 因为这是一个 JavaScript 表达式而不是一个字符串 -->
|
|
|
|
|
<BlogPost :is-published="false" />
|
|
|
|
|
|
|
|
|
|
<!-- 根据一个变量的值动态传入 -->
|
|
|
|
|
<BlogPost :is-published="post.isPublished" />
|
|
|
|
|
```
|
|
|
|
|
|
|
|
|
|
Number类型的
|
|
|
|
|
|
|
|
|
|
```vue
|
|
|
|
|
<!-- 虽然 `42` 是个常量,我们还是需要使用 v-bind -->
|
|
|
|
|
<!-- 因为这是一个 JavaScript 表达式而不是一个字符串 -->
|
|
|
|
|
<BlogPost :likes="42" />
|
|
|
|
|
|
|
|
|
|
<!-- 根据一个变量的值动态传入 -->
|
|
|
|
|
<BlogPost :likes="post.likes" />
|
|
|
|
|
```
|
|
|
|
|
|
|
|
|
|
> 网上的大佬通两个watch来实现一个反射的效果。
|
|
|
|
|
> <https://juejin.cn/post/7082389514353639438>
|
|
|
|
|
|
|
|
|
|
---
|
|
|
|
|
|
|
|
|
|
## 问题
|
|
|
|
|
|
|
|
|
|

|
|
|
|
|
|
|
|
|
|
这里出现了类型转换问题,在这个问题中,主要是在VO、DTO、Entity的层级转换中并不是很好的适配类型的转变,很容出现溢出的问题。
|
|
|
|
|
|
|
|
|
|
在解决这样的问题。我们可以通过泛型结构来实现对公共接口方式,来对类型转换进行一个缓解。
|
|
|
|
|
|
|
|
|
|
也就是,先定义一个公共接口。然后继承这个接口,然后再重写这个公共接口的方法,来实现类型的最终转换。这个方法会显得更加灵活,但在处理
|
|
|
|
|
|
|
|
|
|
问题:
|
|
|
|
|
|
|
|
|
|
---
|
|
|
|
|
|
|
|
|
|
## 任务1
|
|
|
|
|
|
|
|
|
|
注册模块✅
|
|
|
|
|
|
|
|
|
|
登录模块✅
|
|
|
|
|
|
|
|
|
|
验证模块
|
|
|
|
|
|
|
|
|
|
## 任务2
|
|
|
|
|
|
|
|
|
|
前端登录界面✅
|
|
|
|
|
|
|
|
|
|
后台首页界面✅
|
|
|
|
|
|
|
|
|
|
## 任务3
|
|
|
|
|
|
|
|
|
|
创建数据库表:
|
|
|
|
|
|
|
|
|
|
部门表✅
|
|
|
|
|
|
|
|
|
|
人员管理表✅
|
|
|
|
|
|
|
|
|
|
资产类别表✅
|
|
|
|
|
|
|
|
|
|
品牌表✅
|
|
|
|
|
|
|
|
|
|
取得方式表✅
|
|
|
|
|
|
|
|
|
|
供应商表✅
|
|
|
|
|
|
|
|
|
|
存放地点表✅
|
|
|
|
|
|
|
|
|
|
设备用途表✅
|
|
|
|
|
|
|
|
|
|
报废方式表✅
|
|
|
|
|
|
|
|
|
|
资产申购表
|
|
|
|
|
|
|
|
|
|
资产入库表 【兼维护】
|
|
|
|
|
|
|
|
|
|
资产借还表
|
|
|
|
|
|
|
|
|
|
资产转移表
|
|
|
|
|
|
|
|
|
|
资产维修表
|
|
|
|
|
|
|
|
|
|
资产报废表
|
|
|
|
|
|
|
|
|
|
资产盘点表
|
|
|
|
|
|
|
|
|
|
个人信息表 【系统管理员、资产管理员、资产领导】
|
|
|
|
|
|
|
|
|
|
token 密钥:NBNtndVbuixdd19h8L1YlYVW96GjRltY6uRGyPvNnjQ29rMOKm
|
|
|
|
|
|
|
|
|
|
---
|
|
|
|
|
|
|
|
|
|
## 界面设计
|
|
|
|
|
|
|
|
|
|
项目目录结构:
|
|
|
|
|
|
|
|
|
|
```bash
|
|
|
|
|
app5
|
|
|
|
|
|__ .vsconde
|
|
|
|
|
|__ node_modules
|
|
|
|
|
|__ public
|
|
|
|
|
|__ src
|
|
|
|
|
|__ assets
|
|
|
|
|
|__ components
|
|
|
|
|
|__ image
|
|
|
|
|
|__ router
|
|
|
|
|
|__ scss
|
|
|
|
|
|__ utils
|
|
|
|
|
|__ views
|
|
|
|
|
|__ main.js
|
|
|
|
|
|__ style.css
|
|
|
|
|
|__ .gitignore
|
|
|
|
|
|__ index.html
|
|
|
|
|
|__ package-lock.json
|
|
|
|
|
|__ package.json
|
|
|
|
|
|__ README.md
|
|
|
|
|
|__ vite.config.js
|
|
|
|
|
```
|
|
|
|
|
|
|
|
|
|
界面效果图:
|
|
|
|
|
|
|
|
|
|

|
|
|
|
|
|
|
|
|
|

|
|
|
|
|
|
|
|
|
|
---
|
|
|
|
|
|
|
|
|
|
登录提示效果:
|
|
|
|
|
|
|
|
|
|

|
|
|
|
|
|
|
|
|
|
---
|
|
|
|
|
|
|
|
|
|
登录流程图:
|
|
|
|
|
|
|
|
|
|
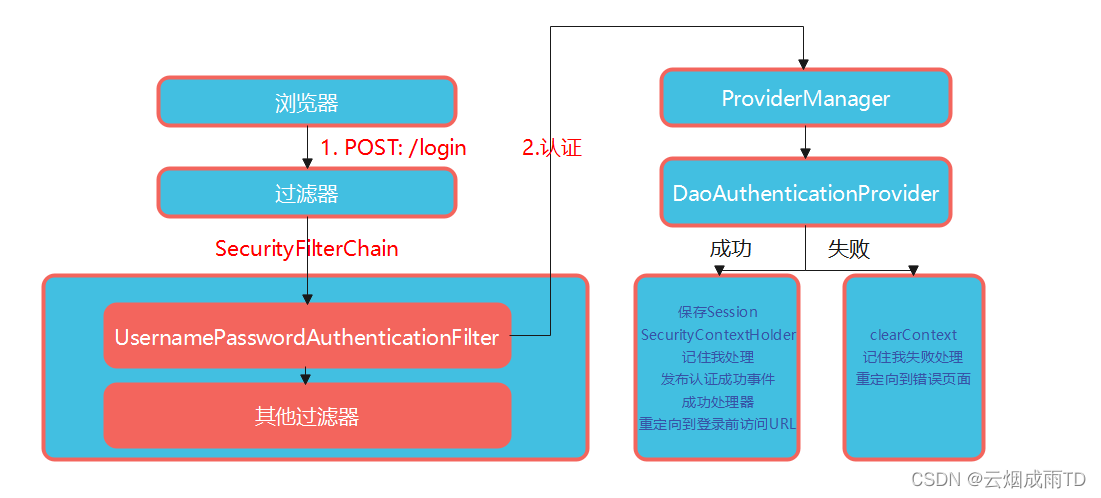
|